By Chris Heintz, P. Eng
The designer of an aircraft chooses the solutions best adapted to the materials used – a continuous joint with wood and composites, a single bolt or heavy (thick) fittings with steel; or riveted joints on relatively light gauge materials and/or when the joints are long (to avoid the weight penalty of many steel bolts).
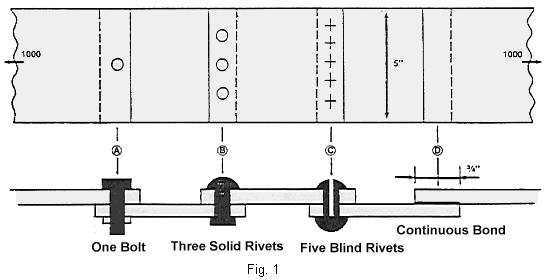
For over 50 years, riveted aluminum structures have been very successful, and are found to varying degrees on virtually all aircraft (whether the complete airframe or just an instrument panel). They do not fail under static or repeated loads and they do not corrode if the rivets are well chosen and properly set.
How to set the rivets correctly can be learned quite easily and should be explained by the designer when he sells drawings or kits to build an aluminum aircraft. The choice of rivets is very simple: only 2017 alloy rivets are commercially readily available (these are the “AD” rivets mentioned in earlier columns). They have good corrosion resistance and are compatible with 2024 and 6061 materials.
Now, let’s look at why they are also a good structural fastener. (See figure 2). First the hole is drilled slightly oversized (via the use of number drills) so that the rivet can easily be introduced after deburring (see Figure 2, item E).
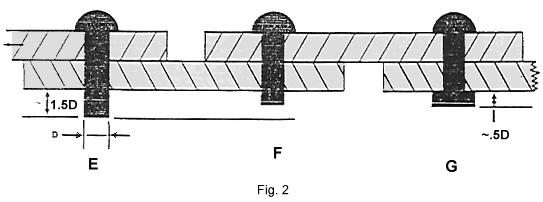
Note that the drawing also indicates correct rivet size depending on the total metal thickness, called the “grip’. Then the rivet is squeezed (compression is achieved by a rivet ‘gun” and a “bucking bar”. The pneumatic gun hammers on one side while the bucking bar, which is simply a heavy chunk of steel, provides the reaction on the other.)
When the rivet shank is compressed, its diameter grows until the hole is completely filled. (See Figure 2, item F). When we further compress the rivet it can only grow further outside the hole and thus the formed head is shaped (see Figure 2, item G), which also gives a correct formed head dimension. Note that a visual inspection of the rivet will immediately tell you if the rivet is good or if it has to be drilled out and replaced.
Such easy inspection is obviously not possible on a bonded or glued joint, which can cause such joints to be less reliable.
Next, let’s look at what makes the set rivet (AD rivet) a good fastener.
First, AD rivets are manufactured with adequate quality control which guarantees you the correct alloy (when you mix bonding cement or resins. you are responsible!)
The rivet fills the hole completely so that no relative motion is possible.
The original as well as the formed head both rest both very well an the parts having been compressed into place. This makes for a snug and sealed joint which will prevent any water from creeping under the heads and corroding underneath.
Also very important is the fact that the heads squeeze assembled parts tightly together and when the loads are applied (see arrows on Figure 2), part of the load is transmitted from one sheet to the other by friction. It just happens in aircraft (this is not the case with racing cars) that the part of the load transmitted by friction corresponds to the high frequency engine loads which would otherwise fatigue the rivet (or require an overdesign of the rivet joint which is done in racing cars where the engine vibration loads are much larger with respect to the static loads). As mentioned, solid riveting when correctly done is an excellent fastener – both reliable and durable. But it also has some drawbacks:
You need special equipment (you’ll need to buy an air compressor, rivet gun(s), rivet snaps and bucking bars);
You need some expertise and prior practice (you’ll need a good teacher for this – errors can be costly in more ways than one);
It is noisy (your family and neighbors may object to your setting rivets in your basement or garage after 10 p.m. or on Sunday morning . . . and that is just when you have the time for it);
You need access to both sides of the parts to be assembled (and this is obviously not always easy or possible: How will you get the bucking bar inside an aileron of a small aircraft?). You’ll often need a helper to “buck” the rivet on the other side, or have long skinny arms and/or a full assortment of bucking bars.
So another solution has been devised – blind rivets, which have none of the above-mentioned disadvantages. Blind rivets, often incorrectly referred to as “pop” rivets, have been used on aircraft since the production of the DC-3 (the tubular ‘Chobert’ rivets).
Blind rivets have been developed to overcome the disadvantages of solid rivets, and some of the blind rivets now available have retained virtually all the advantages of solid rivets. Let’s look at blind rivets in some detail.
First of all, let us understand that a “pop” rivet is a blind rivet, but a blind rivet is not necessarily a pop rivet. (“Pop” rivet is a brand name manufactured by USM – United Shoe Machine – and obviously a “shoe” rivet is not ideal for aircraft use.)
As a typical example, we will use Textron’s Avdel Avex rivet.
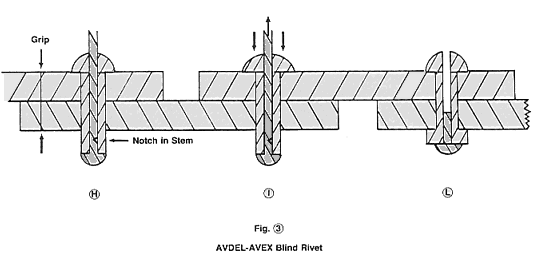
When setting a blind rivet we first drill a slightly oversize hole so that the rivet can easily be inserted (see item H, Figure 3).
A special hand rivet puller (hand rivet gun from a local hardware store – at $15 to $50, depending on quality) is used to pull on the rivet stem and the reaction is applied to the rivet head. The stem has a special head which compresses the rivet tube and makes it grow and fill the hole (see item 1, Figure 3) pulling further. The rivet can only grow outside the parts until the rivet and stem head create a good formed head resting well on the part and squeezing the parts together. At that stage, the stem breaks in tension at the notch. (The set rivet is shown in item L, Figure 3.)
When we examine this blind rivet and compare it to the solid rivet discussed in Part 1 of this discussion, we find some of the same advantages:
The rivet is manufactured under adequate quality control, which guarantees you the quality.
The rivet fills the hole completely preventing any relative motion.
Original and formed heads seal on and compress the parts together (no corrosion, the engine vibration loads do not fatigue the rivet because they are transmitted by friction.)
There is one prime disadvantage to blind rivets. The rivet, being tubular, has a section that is obviously smaller than that of a solid rivet. This means one blind rivet is not as strong as one solid rivet of the same diameter. The designer needs more blind rivets, a larger diameter rivet or a stronger material.
Many designers seem to like the “monel” (stainless steel type) rivets which are stronger, but they may forget that there is a corrosion problem involved with stainless steel. As mentioned in an earlier article, as the aluminum corrodes away, the aircraft owner has no choice but to replace the rivet with a larger diameter rivet later on. Or, if using stainless steel rivets, the builder has the messy burden of dipping every single rivet in zinc-chromate (ZnCr) primer before setting it in the hole … and this is all beside the fact that there is no “good” stainless steel blind rivet readily available on the market!
Going to larger rivet diameters is a limited choice as the large blind rivets are so hard to set by hand that a very expensive and cumbersome tool is required. In my opinion, this defeats the purpose of these rivets in the first place.
Consequently, then, if the decision is made to go with blind rivets as opposed to solid rivets, the builder/designer is left with little choice other than increasing the numbers of rivets. A good rule to be used is that the number of blind rivets needs to be increased roughly in the proportion of 5 blind rivets for 3 solid rivets. In actual fact, this is not a consideration either on light airplanes as most rivets are used on the skins, which need a relatively small rivet pitch (spacing between rivets) anyway in order to prevent waviness in the skin panel. So, the designer is stuck, solid or blind rivets, not with the strength, but with choosing a pitch which provides a nice finish (for aerodynamic and aesthetic reasons).
We have given the example of the Avex blind rivet because this is the only reasonably priced “good” blind rivet readily available (see note). Cost of the Avex rivets is approximately 8 cents per rivet, which compares to 30 cents to $1.00 for a Cherry blind rivet (and, remember, you need 4,000 to 8,000 rivets per aircraft). One other very determinant factor for selecting the Avex rivets is that they are “grip” insensitive. The standard Avex rivets will join from grip 0 to grip 1/4″ (6 mm) with the same rivet. (This compares to four different lengths for the Cherry type). This is a very important factor to prevent errors and must bear heavily on the designer’s decision to make construction as easy and reliable as possible for the builder.
There is one other objection to blind rivets. The rivet is okay for corrosion, but what about the stem? The stem is steel and phosphated, which is the correct protection, but, obviously, where the stem breaks there is no protection. Will this rust? Any galvanic corrosion protection (such as phosphating steel or zinc chromating aluminum) has a reach of about 1/8″ (3 mm) beyond the protected area. With Avex rivets the broken part is only 1/16″ at the most, and extensive experience has confirmed that this is not a problem. (Zenith CH 200 / 300 aircraft assembled with Avex rivets still look like new after more than two decades, with outside storage.)
In this article we do not give any specific shear strength, just some relative values. It is the responsibility of every designer to obtain the values he or she feels can be consistently achieved by the builders (and this takes into account many things, such as basic design philosophy, materials to be jointed, working conditions, etc.)
Nevertheless, I feel impelled to warn some experimental designers that the shear values given by the blind rivet manufacturers in catalogues are to be looked at with some common sense as well. The manufacturer is not a liar, but he does present his product in the best possible way. For example, when they make tests they use very thin sheets so that the stem is long enough to fill the rivet (see figure 4), which is the reason why the individual shear strength is higher than an aircraft solid rivet (the steel stem participates). But on our aircraft, this is relatively seldom the case. As a rule of thumb, a reliable shear value should be 1/2 the catalog specification. But again, the designer should make tests. (Just as an example, when I do blind rivet tests, I knock the stem out before the test, just to be on the safe side!)
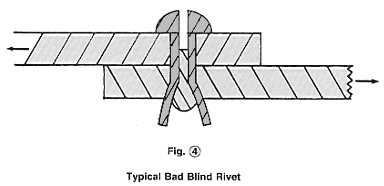
Figure 4 shows a bad blind rivet (a standard hardware “pop” rivet). Note that the rivet does not fill the hole and that there is note a nice, formed head (just the tube is opened); the stem will fall out after some vibrations.
Use the right rivets and you will be very pleased with the results!
